Deep linking
In this guide we will set up our app to handle external URIs. Let's suppose that we want a URI like mychat://chat/Eric to open our app and link straight into a chat screen for some user named "Eric".
Configuration
Previously, we had defined a navigator like this:
const SimpleApp = createAppContainer(
  createStackNavigator({
    Home: { screen: HomeScreen },
    Chat: { screen: ChatScreen },
  })
);
We want paths like chat/Eric to link to a "Chat" screen with the user passed as a param. Let's re-configure our chat screen with a path that tells the router what relative path to match against, and what params to extract. This path spec would be chat/:user.
const SimpleApp = createAppContainer(
  createStackNavigator({
    Home: { screen: HomeScreen },
    Chat: {
      screen: ChatScreen,
      path: 'chat/:user',
    },
  })
);
If we have nested navigators, we need to provide each parent screen with a path. All the paths will be concatenated and can also be an empty string. This path spec would be friends/chat/:user.
const AuthSwitch = createAppContainer(
  createStackNavigator({
    AuthLoading: { screen: AuthLoadingScreen },
    App: {
      screen: AppStack,
      path: '',
    },
    Auth: { screen: AuthStack },
  })
);

const AppStack = createStackNavigator({
  Home: { screen: HomeScreen },
  Friends: {
    screen: FriendsScreen,
    path: 'friends',
  },
});

const FriendsScreen = createStackNavigator({
  Overview: { screen: OverviewScreen },
  Chat: {
    screen: ChatScreen,
    path: 'chat/:user',
  },
});
Set up with Expo projects
First, you will want to specify a URL scheme for your app. This corresponds to the string before :// in a URL, so if your scheme is mychat then a link to your app would be mychat://. The scheme only applies to standalone apps and you need to re-build the standalone app for the change to take effect. In the Expo client app you can deep link using exp://ADDRESS:PORT where ADDRESS is often 127.0.0.1 and PORT is often 19000 - the URL is printed when you run expo start. If you want to test with your custom scheme you will need to run expo build:ios -t simulator or expo build:android and install the resulting binaries in your emulators. You can register for a scheme in your app.json by adding a string under the scheme key:
{
  "expo": {
    "scheme": "mychat"
  }
}
URI Prefix
Next, let's configure our navigation container to extract the path from the app's incoming URI.
// Install this package with `npx expo install expo-linking`
import * as Linking from 'expo-linking';

const SimpleApp = createAppContainer(createStackNavigator({...}));

// Linking.createURL is available as of expo@40.0.1 and expo-linking@2.0.1. If
// you are using older versions, you can upgrade or use Linking.makeUrl instead,
// but note that your deep links in standalone apps will be in the format
// scheme:/// rather than scheme:// if you use makeUrl.
const prefix = Linking.createURL('/');

const MainApp = () => <SimpleApp uriPrefix={prefix} />;
The reason that is necessary to use Linking.createURL is that the scheme will differ depending on whether you're in the client app or in a standalone app.
Test deep linking on iOS
To test the URI on the simulator in the Expo client app, run the following:
xcrun simctl openurl booted [ put your URI prefix in here ]

// for example

xcrun simctl openurl booted exp://127.0.0.1:19000/--/chat/Eric
Test deep linking on Android
To test the intent handling in the Expo client app on Android, run the following:
adb shell am start -W -a android.intent.action.VIEW -d "[ put your URI prefix in here ]" host.exp.exponent

# for example

adb shell am start -W -a android.intent.action.VIEW -d "exp://127.0.0.1:19000/--/chat/jane" host.exp.exponent
Change host.exp.exponent to your app package name if you are testig on a standalone app.
Read the Expo linking guide for more information about how to configure linking in projects built with Expo.
Set up with react-native init projects
URI Prefix
Next, let's configure our navigation container to extract the path from the app's incoming URI.
const SimpleApp = createAppContainer(createStackNavigator({...}));

const prefix = 'mychat://';

const MainApp = () => <SimpleApp uriPrefix={prefix} />;
iOS
Let's configure the native iOS app to open based on the mychat:// URI scheme.
In SimpleApp/ios/SimpleApp/AppDelegate.m:
// Add the header at the top of the file:
#import <React/RCTLinkingManager.h>

// Add this above the `@end`:
- (BOOL)application:(UIApplication *)app openURL:(NSURL *)url
            options:(NSDictionary<UIApplicationOpenURLOptionsKey,id> *)options
{
  return [RCTLinkingManager application:app openURL:url options:options];
}
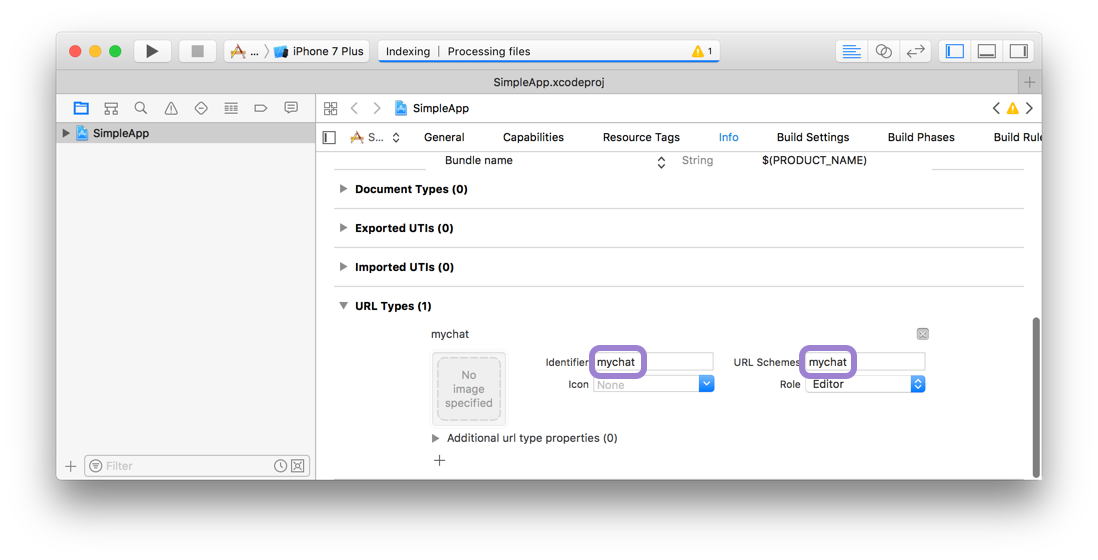
In Xcode, open the project at SimpleApp/ios/SimpleApp.xcodeproj. Select the project in sidebar and navigate to the info tab. Scroll down to "URL Types" and add one. In the new URL type, set the identifier and the URL scheme to your desired URL scheme.

Now you can press play in Xcode, or re-build on the command line:
react-native run-ios
To test the URI on the simulator, run the following:
xcrun simctl openurl booted mychat://chat/Eric
To test the URI on a real device, open Safari and type mychat://chat/Eric.
Android
To configure the external linking in Android, you can create a new intent in the manifest.
In SimpleApp/android/app/src/main/AndroidManifest.xml, do these followings adjustments:
- Set
launchModeofMainActivitytosingleTaskin order to receive intent on existingMainActivity. It is useful if you want to perform navigation using deep link you have been registered - details - Add the new
intent-filterinside theMainActivityentry with aVIEWtype action:
<activity
    android:name=".MainActivity"
    android:launchMode="singleTask">
    <intent-filter>
        <action android:name="android.intent.action.MAIN" />
        <category android:name="android.intent.category.LAUNCHER" />
    </intent-filter>
    <intent-filter>
        <action android:name="android.intent.action.VIEW" />
        <category android:name="android.intent.category.DEFAULT" />
        <category android:name="android.intent.category.BROWSABLE" />
        <data android:scheme="mychat" />
    </intent-filter>
</activity>
Now, re-install the app:
react-native run-android
To test the intent handling in Android, run the following:
adb shell am start -W -a android.intent.action.VIEW -d "mychat://chat/Eric" com.simpleapp
Disable deep linking
In case you want to handle routing with deep-linking by yourself instead of react-navigation, you can pass enableURLHandling={false} prop to your app container:
const SimpleApp = createAppContainer(createStackNavigator({...}));

const MainApp = () => <SimpleApp enableURLHandling={false} />;
Then, to handle the URL with the parameters, you can use Linking in your components to react to events.
componentDidMount() {
    // [...]
    Linking.addEventListener('url', this.handleDeepLink)
}
componentWillUnmount() {
    // [...]
    Linking.removeEventListener('url', this.handleDeepLink);
}
And the method to handle it :
handleDeepLink(e) {
    const route = e.url.replace(/.*?:\/\//g, '')
    // use route to navigate
    // ...
}
This should get you started! 🥳